Damaged Spark Plug Hole Thread Chaser

I really doubt that, given that it was snuggly enclosed in a sizable heat sink and didn’t budge until quenched There was a substantially intact ring of plastic around the piston which I had to cut off when removing the piston rings for cleaning.

Plus I don’t have a heat gun.

A propane or butane torch might have got hot enough aqnd would have avoided the ash hazard, which was worse than I expected, not being a big BBQ fan.

That’s a cast iron block, you can tell from the rust in the waterways.

Have you put an insert for the spark plug in the head?

I love this thread.

Maybe you can just blowtorch the cylinder or something and get it hot enough to melt the plastic? I mean if it’s cast iron block then there’s no real threat of damage…

It’s like watching a one-legged man in a cage fight.

1 Like

As I said above. But it (and any damage) is already done. A blowtorch might give a bit more control but its main advantage is a lack of abrasive ash.

Actually i dont think the meltingvplastic did free it though that was the idea. There was a substantially intact ring of plastic around the lower compression ring which I cut off (Ive taken all the pistons out for cleaning) and it didn’t budge until quenched.

As I said, I think the differential cooling/contraction of the quench freed it, which I hadnt planned so cant really take any credit for

No. Used JB Weld high temp epoxy and ran a tap through from the inside.
I may use foil on the plug to pack out the damaged threads a bit. Havn\t decided yet and it\ll be a while before I get to that point.

I just hope the quenching didn’t crack the block or anything though… cast iron can crack especially with differential cooling. If you cracked the engine block then it’s a total write off, there’s no easy way to fix it.

Its a distinct possibility of course, but the quenching was via the aluminium dish on top of the block and formed around the piston.

It would only be direct if the latter had a hole melted in it, which is possible but not confirmed at this time.

I’ll have a look later, though I don’t really much want to know.

Couple of pin holes, giving 2 largish drops a second. Could have been better, could have been worse.

Could also have been corrosion after the event. (I left the dish under the car). Water, wood ash, aluminium and charcoal seems likely to lead to galvanic. action.

Tried PVC pipe. Didn’t work.

This lot in Taichung make/sell a ring compressor that has a. “wriggley” profile and looks a bit better than the standard one,

but rather than delay more I just got a standard one in The Relatively Good Ktown Toolshop. 280NT.

1.5 pistons back in so far (still have to replace the big end on the second one) so its working, though I cut myself fairly badly fiddling with it on the train from Ktown

Have you tried an aluminium beer can, cut the top and bottom off to make a cylinder, cut 10mm slits around the bottom so you can flare the bottom out and make a flange.

If you can’t get a post clamp that will go around get a few pipe clamps open them out and feed them into each other till you get a big enough diameter.

Thought of it (though a beercan wouldn’t be wide enough, could perhaps make bands by cutting vertically, IF the curve wasn’t an issue, or, more likely, use two overlapped.

But for 280NT it wasn’t worth yet more cocking about.

2 Likes

The jury-rigging is part of the fun, but you have probably spent enough time on this part already, that the 280NT (plus travel) is worth it just to move on.

Time to put the head back on, which means deciding on head bolt lubrication and torque, a bit classic and fundamental.

CB20 manual says dry. CB23 manual doesnt say.

Torque specs are slightly different but 40 ftlbs is in the overlap

I have no manual for my CB22 engine but assume dry 40 could apply.

My problem is I’ve never installed any threaded component dry and am rather reluctant to start now with a high torque item.

Engineering Toolbox suggests reducing dry torque by 30-40% for SAE40 oil used as an assembly lube

Was going to do that, when I came across this suggestion for deriving a “torque and angle” spec from a dry torque which could then be applied to a lubed bolt.

" Take the dry bolt and torque to a 1/4-1/3 of its published dry torque spec. Then, mark the bolt and the part, and torque to its full value. Note how far it has turned. Now, with the lubed or Loc-Tited bolt, torque he same 1/4-1/3 torque you used earlier, then tighten to the same angle of rotation as when it was dry

.” www.thumpertalk.com/forums/topic/426292-greasing-a…/

Not sure the apparent assumption that the initial torqueing is unaffected by lubrication is valid, but if it is, subsequently you should get the right bolt tension with a lubed thread (though any initial “dry galling” damage is already done),

If doing this, aluslip might be more persistent and thus a better choice.

Tried it. Torqued in 4 X 10 ftlb increments dry (washed with carb cleaner) from finger tight, laying a ruler on the head to record starting angle.

I used a feeler guage set as a carpenters angle gauge (which I dont have here) and read off the angle with a geometry set protractor.

Fiddly and probably error prone. A possible systematic error is I had all the bolts initially finger tight but the outer ones loosen as the the inner bolts are tightened.

Should probably have started them from finger tight individually.

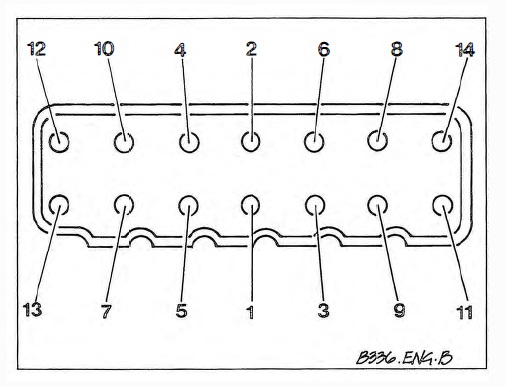
Initial Angle for the first 10 ftlb increament. in order of the tightening sequence was

180 130 160 135 200 180 100 225

Total Additional Angle for the last three increments. in order of the tightening sequence was

139 195 191 245 118 128 127 256

The next step would be slackening off, lubricating, torqueing to 10 ftlbs, and tightening it to those angles, BUT variation doesn’t give me a lot of confidence in the method (in my hands, at least)

That sounds like they were tightened in a linear sequence rather than alternating? :thinking:

Should have been something like this:

I learned a new word today. I’ve taken a look at this thread a few times before, and it’s appeared in the thread several times, but this is the first time I’ve noticed it.

Whatever you do just don’t change any spark plugs from now on.

No. They were tightened in diagonally opposed pairs, working outwards from the middle, like in the manual. Seems to be pretty standard.

Isn’t usually quite this involved

2 Likes